HOW TO FOAM ROLL YOUR CLIENTS.
22 March 2021
When you use SMR, you are relieving tension in the muscles by breaking up the knots. Knots can form through a variety of reasons such as repeated improper movement patterns, injuries, stress etc. When a muscle has knots, it can be held in a short and tight position. Leaving it this way over time can cause a muscle imbalance. When thinking of a muscle imbalance, think of the agonists and antagonists (the opposing muscle); the simplest example of this is the Pectoralis Major and the Rhomboids and Mid Traps. It’s common to see an imbalance in someone who works behind a desk and does not have a proper workout routine. The chest will get tight and short, which pulls the acromial end of the clavicle forwards. This stretches out the rhomboids and mid traps, making them weaker and less able to hold the clavicle in the correct position. Over time, this leads to a hunched shoulder position; the longer it is in this position, the harder it is to correct.
During my time as a PT I would teach my clients how to foam roll and stretch, but I would also foam roll them as well. This is important for two reasons; the first one is that you will always be able to foam roll the client better and more effectively than they can themselves. You will be more direct with the pressure, and it is harder for the client to stop when the knot is painful. The second is that it gives you a reason to be there with the client. The more reasons there are for you to spend time with your client, the less likely they are to drop you and do the training themselves.
Below is a list of areas you could try foam rolling with your clients, but first, here is the process I use when foam rolling new clients. Contrary to popular opinion, you should not just roll over muscle groups when foam rolling. The rolling should only be used to find the sore spots. Once you have found a sore area, hold for 20 – 30 seconds or until the pain goes away. Then move to the next area, and the next, holding for 20-30 seconds on each sore spot. Slowly increase the pressure and stop when the client signals - they will know if it is unbearable. Foam rolling can be painful, so do not be afraid if the client shows some pain. Foam roll one side at a time, and once this is done, ask the client to stand up and walk around to feel the difference. This is so the new client can feel the difference between sides and see the value of having you as their trainer. Ask the client, “Can you feel the difference? This is how I want you to feel all the time.”
When foam rolling the calves, make sure the longer roller is sitting beneath the ankles, and use the smaller roller to roll the calves. As you move up the calf muscle, move the foam roller slowly from side to side to target each area. Hold for 20 – 30 seconds at each spot. From my experience, the client will either have knots on the inside, middle or outside of the calf muscle; usually not on the whole calf muscle (unless they have very tight calves).

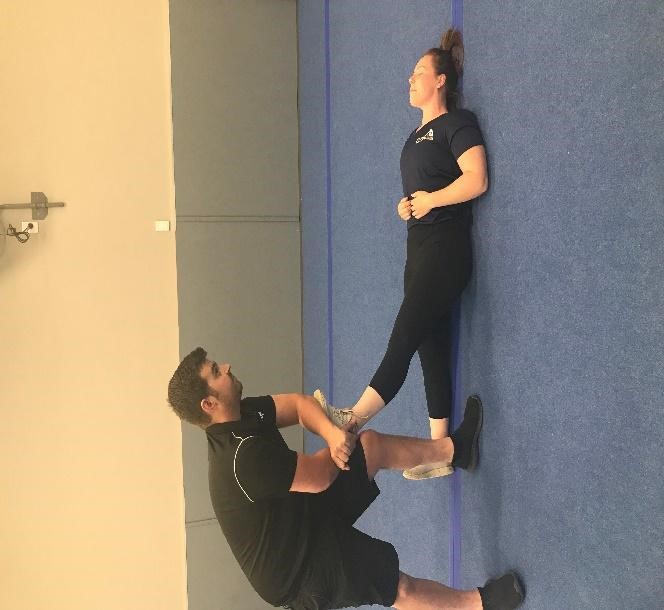
Once you have foam rolled the client’s calves, perform this stretch. With the client lying on their back, straighten one leg and lift to the angle just below where the client feels their hamstring stretching (this will vary from person to person depending on the tightness of their hamstrings). Once you have found this area, place your forearm on the balls of the client’s feet. Apply pressure to a point where the client is comfortable, and hold for 20 – 30 seconds. While holding the stretch, you can slowly move your forearm each side of the foot to stretch different parts of the calf.
The IT band is a thick band of Fascia - not a muscle - so it can’t be stretched, but it can be foam rolled.
The IT band is easy to foam roll as it is just a band (around a belt thickness) going straight up the outside of the quad. It can however be very painful for a client, and you may need to ease off the pressure. If the client still finds it too painful, I have attached a photo of how the client can roll out the IT band by themselves against a wall, placing much less pressure on each spot. With the longer foam roller placed beneath the client’s knee and ankle, and the client’s leg on a 90-degree angle as shown in the photo, you roll up the leg and hold on each sore spot for 20 – 30 seconds. Stop at around pocket height as this is about where the head of the femur is located and the IT band ends.

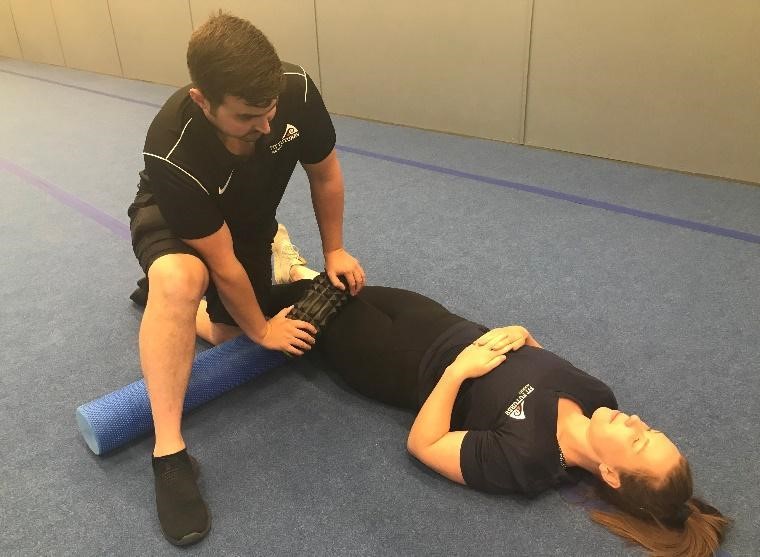
With the client lying on their back, place the longer foam roller beneath one knee, and use the smaller roller on their quads. As with the calves, you will be rolling side to side as you roll up the leg. This is so you can roll all four quad muscles. When you find the sore spot, hold for 20 – 30 seconds.
After the quad foam roll, the client should stretch out the quads. You can help the client with this stretch by having them down on one knee in a deep lunge position (make sure their knee is on a mat or cushion as this can be painful on the client’s knee.) Slowly lift the client’s back foot to a position where they are comfortable and can feel a stretch in their quads and hip flexor. Once they are comfortable doing this, they will be able to do it at home using a wall.
There are many other areas you can foam roll, but these are the easiest to foam roll on your clients. I recommend trying these out on your friends and family before trying them on clients.
https://www.health.harvard.edu/staying-healthy/should-you-add-foam-rolling-to-your-workout-routine
NASM Essentials of Corrective Exercise Training by the National Academy of Sports Medicine
Written by tutor: Ben Norriss